Sunday, February 28, 2021

ORGANIZING 2021

 So this morning I opened up my emails to discover this blog from Prairie Moon Quilts, https://prairiemoonquilts.com/category/studio-organizing-challenge/  I'm two months late but what the heck.  Its never too late to join in on an organizing challenge.  And really, I've been doing some organizing this year in spite of being behind.  One of Shelly's challenges was to attack a pile and I"ve been doing that lately.  Another is to choose 3 troublesome things to deal with.  I think I have more than 3 things but 3 is a good place to start.  

I've already digging into piles and moving things around.  Lets start with my closet/ironing board, etc.  


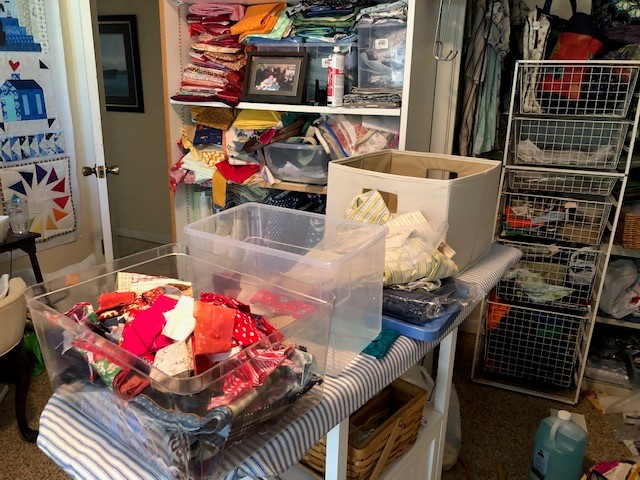
Believe it or not, this is progress.  The wire rack you see in the closet (minus doors) has been moved from my son's room and exchanged for a bookcase that was previously in the closet.  In doing so, I delved into my section  of bins that housed my patriotic scraps and unfinished projects.  Last year, I participated in sewing "unity" with Bonnie Hunter and used up a bunch of patriotic scraps.  Never mind, they were still multiplying in the closet so I decided to call a friend.  Barbie works on Quilts of Valor and I asked her if she wanted some scraps.  She happily said yes and I have created a pile for her, including at least 3 partial tops.  Maybe her guild can work them into something.  You can see on my ironing table that it has now gotten a new cover.  A fresh b/w ticking that I brought back from England in 2016.  Fond memories of that visit with my friend Barbara.  


This second pic is of my cutting table, a corner that desperately needs to be organized and more.  Try as I might, I can't keep more than a tiny space open on my cutting table to cut strips and squares.  I tend to push whatever it is I worked on aside to create a space.  More than once last year, I tidied this up but I aim to get better.  

So, my three things are:  Share patriotic fabrics with others, create a new ironing board cover, and go through bins to see what is in them.  

Already done!  In two bins that rest by my front door, I found many finished tops, some with backings that just need quilting.  One I donated to my guild with backing to finish and donate for a local fundraiser.  One I put on Facebook and managed to sell the top with its backing!  And the third went to my church to be tied and added to the Lutheran World Relief pile.  I'm feeling quite accomplished already!  

Thursday, February 25, 2021

TO STEAM OR NOT TO STEAM, THAT IS THE QUESTION!

 I follow Jo Kramer's blog and today she talked about irons.  https://www.joscountryjunction.com/ask-jo-the-iron-edition/

So I thought I would give you my two cents on irons for what it is worth.  

I bought one of those $300 irons from a quilt show that lasted maybe two years. I sent it back to have a new heater put in it. Cost $55. Lasted about 6 months and died. My husband went out and bought a Hamilton Beach $25 iron from Big Lots. It is going strong still. I never use steam but my son decided to use steam with it and it leaked all over everything. I said no more so husband went out and bought an iron just for them. Even though I had one sitting on the shelf. Mine has an auto shut but only after sitting for a while. I like that part. Because sometimes I walk out and leave it on all night.

I like Jo's idea of going to thrift shops to buy irons for $2.  Hopefully, they put a tag on them that says WORKS like hers did.  How do you know it works if you can't plug it in?  I dont go to Thrift stores very often as I certainly don't need anymore junk.  I need to get rid of the junk.  

I do have several irons sitting around the house but I do prefer the Hamilton Beach one so the rest never get tried.  I keep a spray bottle of water in my sewing room and I also have Best Press.  I was cleaning out my closet this week and found a gallon of Best Press I forgot I had.  Time to refill all the small ones.  I really dont use either very often but will when I need to.

In an online group recently, there was discussion about setting your seams vs not setting your seams.  I have never gotten into the habit of seam setting but I did notice, that when I tried it, my blocks were flatter.  Maybe they were onto something, those folks who always set their seams.  There was a quilter in my group whose name was Ruth.  I watched her once in a sewing session and she always set, pressed, flipped and pressed.  She had quite a way of doing it quickly.  Ruth has since passed but I will always fondly remember her for her smile and her pressing abilities.  Until next time, sew your heart out!  

Tuesday, February 23, 2021

SPRING ORGANIZING

 OMG!!!! There comes a time in every quilter's life where she has to pull it all out, purge and rearrange.  I think that time has come for me.  Not posting a pic yet but I will definitely get before and after photos.  My son has been wanting a bookcase for his room.  In my sewing room closet is a very nice 2 shelf brown bookcase.  In his closet are stackable wire racks that I continue to use for sewing supplies. So I've decided to make a swap.  He can have the bookcase and I'll retrieve the racks with drawers that I need.  This will require a complete major overhaul of the closet in my sewing room.  

When this spare bedroom became my sewing room about ten years ago, the folding doors came off the closet and are in the shed.  But its time to rework the situation and purge.  And I mean purge.  

In addition, my ironing board desperately needs a new cover.  In 2016 I went to England to visit a friend and attend the International Quilt Festival in Birmingham.  At that time, I purchased some red and white ticking and blue and white ticking fabric but never used it.  I pulled out the b/w today and it is the perfect width and length for the ironing board.  All I need to do is round the corner and add a pocket on either side for the rope or elastic.  I can do that and get rid of the ugly brown one that no longer looks clean even after washing.  And everytime I iron on my new cover I will think of Barbara!  Why do we let ourselves get to this level?  

Keep in touch to see my progress!  Its starting to be spring in Fl and time to spring clean!  


Monday, February 22, 2021

Updates and Quilt Love!

 I've been involved in an online quilting group for many years and have been quite active.  But as happens with a lot of things, I chose to leave the group where I spent too much time daily, and concentrate on my blog instead.  I have much I would like to share and this is the best way.  

Last week I posted a pic of this quilt on Facebook!


This was a Stack and Whack quilt as opposed to a one block wonder.  There is a slight difference and there are two groups on Facebook that will advise you of one or the other.  I prefer this style because of the way the triangles set off the "kaleidoscope flowers".  I have a guild friend who sews a lot for our charitable purposes and she had carried around this border fabric on a bolt for sometime.  She just didn't know what to do with it.  Its a Jackie Robinson fabric called 40's roses I believe or something like that.  Certainly not available for purchase and I wasn't familiar with Jackie but she does have a company called Animas.  

At any rate, I thought the border and colors were beautiful and wanted to try my hand at creating a stack and whack with it.  You have to carefully pin together 6 layers of fabric, cut 3 3/4" or so and then cut 60 degree triangles out of the strip.  Those triangles create the flower!  

 Maybe you can see it better here draped on a chair.  I usually take my photos of quilts on the floor as above because I can spread them out.  But one of my HS friends on Facebook saw it and thought it was a rug so I have to explain that to her.  But another friend saw the quilt, loved it and bought it for his granddaughter.  I hope she loves it.  

The fabric was so beautiful I just had to miter the corners.  However, you can see in the top photo, bottom left corner I didn't have enough fabric to miter all 4 corners.  So in that last corner I sewed the excess cut offs together to create a border and then appliqued a rose in that section.  No one but me would notice or pick it out.  

I had mitered corners before but it wasn't until I purchased a mitered border tool that I got good at it.  http://www.sewbizmarion.com/shop/c/p/Quick-Easy-BORDER-Mitering-Tool-Large.htm

I had purchased the small tool which is perfectly usable even for a large width fabric.  It made a difference in my mitering abilities!  

Until next time, have a happy quilting day!